|
| Wrong way |
|
| Right way |
| (photo courtesy John Stangler) |
My three-year-old Palm Zire 72 PDA started behaving erratically and not keeping a charge, so I figured it needed a new battery. I found a number of sources of replacement batteries on the web, and purchased one from ipods99.com. They provide instructions and some needed tools. However, I found that replacing the Zire 72 battery is far more daunting than slipping new AAs into your remote control, and the instructions from ipods99.com, while helpful, proved inadequate. Here is a more detailed procedure that I hope will help you. This is not for the faint of heart, but replacing the battery is a lot less expensive than replacing the whole device.
Needless to say, sync the Palm to your desktop before doing anything.
Use a T5 Torx screwdriver to remove the two screws visible at the bottom rear of the Zire 72. (ipods99.com includes this tool.)
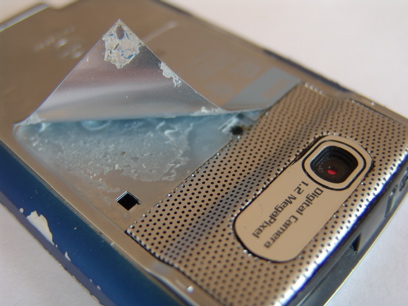
Another screw is hidden under the adhesive label on the back. With considerable effort, you can peel this label off (start at the upper left). The result will be a label that is bent and will never look like new again. If I had it to do again, I would just cut out the portion of the label covering the screw, permanently exposing the small screw but leaving the rest of the label untouched. The screw is at the upper edge of the label, right underneath the upper left corner of the bluetooth icon. This screw holds down a tab of the mesh screen that surrounds the camera. Once exposed, remove this screw with a very small Phillips screwdriver (also provided by ipods99.com).
|
|
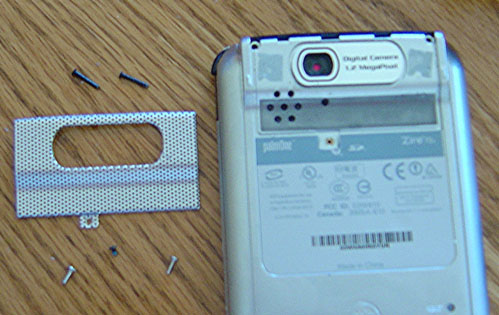
You can now gently pry up and remove the mesh. It has a press fit along its upper edge.
Underneath the mesh are two more Phillips head screws. Remove these.
You are now going to separate the two halves of the case along a line that goes along the back side of the stylus silo, the front side of the black bezel around the expansion card slot, and around the other two sides. This is easier said than done; the fit is incredibly tight. Plan on further damaging your already-peeling blue coating. Start from the top and work down, because there may be lugs at the bottom that engage. Once again, ipods99.com helpfully provides a tool for this, but it wasn't up to the task. I had to use multiple small screwdrivers to pry the case open, and could not avoid bending some metal. According to Roger Plant, a better tool is a mechanic's feeler gauge if you have one. If it wants to separate on the wrong side of the black bezel, don't let it, or replace it on the back half before reassembling.
While struggling with this, you will inadvertently press buttons that will turn on the Palm and do who knows what damage to its data. Don't worry, because this Palm is headed for a hard reset, which will clear all the data anyway.
Once the sides are separated, open up the case. Be careful; the two halves are connected by two delicate cables, which you may want to unplug. One is a ribbon cable that goes to the camera. (Thanks to Sylvain Gagnon and John Carter for that information.)
You will see the battery and its tiny connector to the board. Remove the connector (I used tweezers), remembering which side the red wire is on.
My old battery was firmly glued down on its back side. Pry the battery up to release it. Then insert the new battery and attach the connector. Some double-sided tape will help hold the battery in place while you reassemble the unit.
Snap the case back together. Michael Bernhaut notes that the tiny clear plastic "light indicator" that relays the green power light to the outside of the case needs to be properly positioned, if it has gotten loose. It has 2 registration holes which need to be placed carefully over the 2 registration pins inside the top of the Zire case on the side opposite the stylus. The curved shoulder of this plastic piece needs to be on the side of the curved shoulder of the Zire.
Then replace the screws and mesh. If you peeled back the label, find a way to glue it down again.
Your new battery should be charged for 3 hours before using the Palm. Then do a hard reset by holding the power button, pressing the tiny reset button in the hole on the back, waiting for the Palm Powered logo, and then releasing the power button. Confirm the hard reset and continue to follow instructions to set up and sync your device. Hopefully the battery will last another three years.
My Palm came back to life after this procedure, but sadly, the camera no longer works. (Others have reported better luck.) Hopefully, with these instructions, you won't have to subject your Palm to the trauma that I inflicted on mine while discovering how to do this.